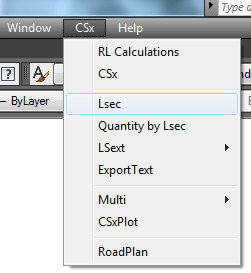
| HOME | L Section | N E X T ››› |
This will display:
Taking all parameters one by one:
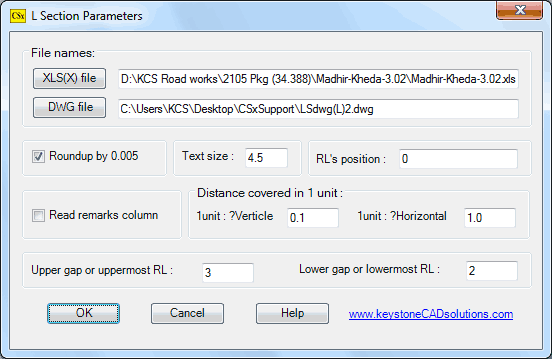
 Click on 'XLS(X) File' button to browse XLS data file, if required.
This data file's path will display in edit box.
Click on 'XLS(X) File' button to browse XLS data file, if required.
This data file's path will display in edit box.
 Click 'DWG File' button to browse a DWG block used in L Section.
This file may be 'LSdwg(L)1.dwg', present in 'CSxSupport' folder.
Click 'DWG File' button to browse a DWG block used in L Section.
This file may be 'LSdwg(L)1.dwg', present in 'CSxSupport' folder.
 'Off' the 'Roundup by 0.005' button.
'On' this button in final L section, if you want.
'Off' the 'Roundup by 0.005' button.
'On' this button in final L section, if you want.
 Enter '4.5' in edit box, for height of texts used in L Section.
 Here, we want L section of centre RLs of GL data, hence give '0', in this edit box.
 'Off' this button. In final L section, this will 'On'.
 Enter 0.1 and 1.0 for '1 unit : ?Verticle' and '1 unit : ?Horizontal' respectively.
1 meter for every 0.1 unit in vertical and 1 meter for every
1.0 unit in horizontal direction. Here vertical is 10
times large then horizontal. This is the ratio, not scale.
Give scale at plotting time.
Enter 0.1 and 1.0 for '1 unit : ?Verticle' and '1 unit : ?Horizontal' respectively.
1 meter for every 0.1 unit in vertical and 1 meter for every
1.0 unit in horizontal direction. Here vertical is 10
times large then horizontal. This is the ratio, not scale.
Give scale at plotting time.
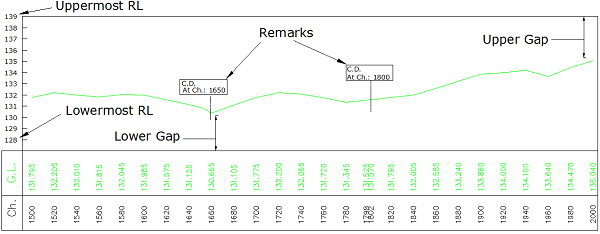
 See the following self explanatory figure for above parameter:
After few seconds, you found following messages in command prompt:

Give Range for L section (????-????) <ALL>: Press enter for all. A block will display in drawing area:
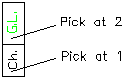
and following messages will display in command prompt:
Pick point for chainages or 'Enter': Pick at 1
Pick point for (0.000) RLs or 'Enter': Pick at 2
After picking all points, we will get L section as shown in previous page.
'Save As' dialog box will display. Click 'Save', to save this drawing:
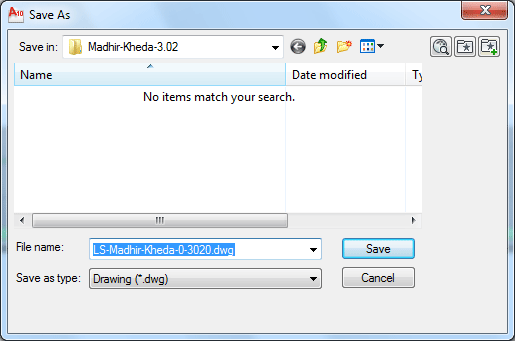
Note that file name with full path is displayed in top of AutoCAD window:

Now we want to draw cross sections in this L section drawing, to check GL survey data:
Top Next