| HOME | CSxPlot | N E X T ››› |
VIDEO [1.79 MB] Video not run?
Purpose of this command is, to continue plotting of cross sections in a single command. If you give AutoCAD's plot command for every cross section, it will take lot of time.
If you use this command first time after 'CSx' installation, first exicute 'plot' command for any One cross section drawing and restart AutoCAD.
In blank DWG file, give 'CSxPlot' command:
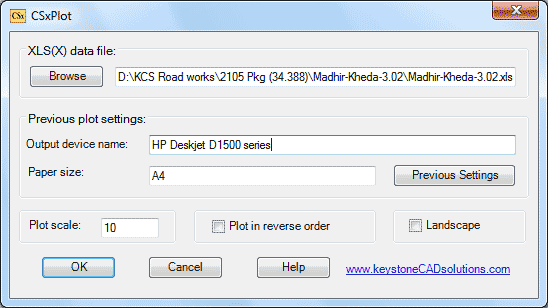
Click 'Previous Settings' button if required.
'Output device name' and 'Paper size' will display automatically.
If not, cancel this command and use the -PLOT command to find these values.
Click 'Browse...' button to browse XLS data file, having 'GL' sheet.
Type '8' in 'Plot scale:' edit box or give '10' for 1:100 scale.
Small value gives small size and greater value gives large size of drawing.
Give 'fit' for no scale or fit to scale.
Select 'OK' button.
Following question will display in command prompt:

Press enter to plot all cross sections or give a range,
for example:
Enter '100-200' will plot all cross sections from chainage 100 to 200.
- If this command not works then take one printout by 'plot' command, and give 'CSxplot' command again.
- Printer and papers should be ready.
- All drawings for plotting are taken from 'MultiCS' sub folder. If this folder is not present, then all drawings are taken from 'Cross Sections' sub folder.